NanoPi搭建网络附加存储NAS系统
NanoPi搭建网络附加存储NAS系统
CzrTuringB:
2023年9月15日:想做这个的起因是我刚好这个暑假去了研究所学习,走之前没有将家里机械硬盘中的资料完全拷贝到电脑上,在想要看的时候又没法获取,所以就想着做一个小型NAS系统,用于存储一些PDF书籍和文献。之前在花生壳上购买了一年的内网穿透域名服务(很坑,使用效果及其不理想),后面还是换成了云服务器用来部署我的博客,为了不让NanoPI闲置,就想着搭载U盘和FRP内网穿透做一个小型的云存储系统。
第一部分 准备工作
-
硬件组成:
1
2
3
@NanoPI
@USB WIFI接收器
@32G U盘 -
烧录系统:具有OLED屏幕驱动的系统
-
源更新:
1
2
3
4
5
6
7
8
9
10
11
12
13
14
15
sudo cp /etc/apt/sources.list /etc/apt/sources.list.old
//打开/etc/apt/sources.list文件
deb http://mirrors.ustc.edu.cn/ubuntu-ports/ xenial main multiverse restricted universe
deb http://mirrors.ustc.edu.cn/ubuntu-ports/ xenial-backports main multiverse restricted universe
deb http://mirrors.ustc.edu.cn/ubuntu-ports/ xenial-proposed main multiverse restricted universe
deb http://mirrors.ustc.edu.cn/ubuntu-ports/ xenial-security main multiverse restricted universe
deb http://mirrors.ustc.edu.cn/ubuntu-ports/ xenial-updates main multiverse restricted universe
deb-src http://mirrors.ustc.edu.cn/ubuntu-ports/ xenial main multiverse restricted universe
deb-src http://mirrors.ustc.edu.cn/ubuntu-ports/ xenial-backports main multiverse restricted universe
deb-src http://mirrors.ustc.edu.cn/ubuntu-ports/ xenial-proposed main multiverse restricted universe
deb-src http://mirrors.ustc.edu.cn/ubuntu-ports/ xenial-security main multiverse restricted universe
deb-src http://mirrors.ustc.edu.cn/ubuntu-ports/ xenial-updates main multiverse restricted universe
//删除原内容并复制上述内容然后保存
sudo apt-get update
sudo apt-get upgrade
第二部分 添加USB设备
-
为什么不使用机械硬盘:NanoPi的供电不足以支持机械硬盘正常工作,外接电源给机械硬盘进行供电,会使得整个系统非常臃肿,同时我对于存储空间的需求并不是很高,U盘足以满足我的使用。
-
登录root账号。
-
将U盘插在NanoPi上,确认NanoPi识别到此硬盘:
1
2
3
4
5查看硬盘信息
sudo fdisk -l
我的U盘相关信息
Device Start End Sectors Size Type
/dev/sda1 2048 62947327 62945280 30G Microsoft basic data -
安装ntfs-3g
1
sudo apt-get install ntfs-3g
-
格式化U盘:一般情况下,我们使用的U盘格式是FAT32或者NTFS数据格式的,这种数据格式在linux系统中使用会出现问题,需要将其格式化为ext3格式。
1
2
3
4
5
6
7
8
9
10确认树莓派识别到现有的硬盘:
sudo fdisk -l | grep '^Disk'
确认硬盘格式:
sudo blkid
如果之前装载了U盘,需要卸载U盘
sudo umount /dev/sda1
格式化U盘
sudo mkfs.ext3 /dev/sda1
格式化完成后查看硬盘格式,确认是否为ext3
sudo blkid -
指定USB硬盘位置:
1
2
3
4
5
6
7
8
9
10
11
12
13
14
15
16
17
18
19
20
21创建一个路径
sudo mkdir /media/myUsb
指定这个路径的用户权限,pi是我的用户名
sudo chown pi:pi /media/myUsb
挂载这个路径
sudo mount -t auto -o uid=pi,gid=pi /dev/sda1 /media/myUsb
确认硬盘的数据
cd /media/myUsb
ls
设计开机自动挂载:
备份文件
sudo cp /etc/fstab /etc/fstab.backup
查看U盘的UID
sudo blkid
编辑fstab文件
sudo vim /etc/fstab
在文件最后一行添加下面内容:
UUID="U盘的UUID" /media/myUsb auto rw,defaults 0 0
UUID="a8ec1901-b7d3-467f-9393-217ba5804dc0" /media/myUsb auto rw,defaults 0 0
输入以下命令查看文件是否有误
sudo mount -a
第三部分 搭建文件服务器Samba
-
1987年,微软公司和英特尔公司共同制定了SMB(server Messages Block)协议用来解决局域网内的文件或打印机等的资源共享问题。但是这时后还是解决不了跨系统之间的文件共享。直到1991年,在读大学的Tridgwell 基于SMB协议开发能够解决Linux系统和windows系统之间的文件的问题——也就是SMBServer服务测序。后来被命名为samba(根据一个拉丁舞名字)。如今,samba服务测序成为了在Linux和windows系统之间共享文件的最佳选择。
-
安装远程文件系统:
1
sudo apt-get install samba
-
创建用户,其他设备访问NanoPi,需要使用这个账户进行登录
1
2按照提示输入密码和基本信息即可
sudo adduser czr -
将用户添加到Samba上:
1
2
sudo usermod -a -G sambashare czr
sudo pdbedit -a -u czr -
创建共享文件夹:
1
2
3
4设置共享文件夹权限
sudo chown root:sambashare /media/myUsb/
sudo chmod 770 /media/myUsb/
sudo chmod g+s /media/myUsb/ -
设置Samba:
1
2
3
4
5
6
7
8
9
10
11
12
13编辑Samba文件内容
sudo vim /etc/samba/smb.conf
找到Share Definitions,将只读设为no
read only = no
在文件末尾添加:
[myUsb]
comment = Shared Folder
path = /media/myUsb
read only = no
guest ok = no
browseable = yes
create mask = 0770
directory mask = 0770 -
重启Samba:
1
sudo /etc/init.d/samba restart
第四部分 FRP内网穿透
-
云服务器设置:
-
下载frp服务端:
1
2
3
cd /usr/local
wget https://github.com/fatedier/frp/releases/download/v0.33.0/frp_0.33.0_linux_amd64.tar.gz
tar -zxvf frp_0.33.0_linux_amd64.tar.gz -
配置frps.ini文件:
1
2
3
4
5
6
7
8
9
10
11
12
13
14
15
16
17
18
19
20
cd ./frp_0.33.0_linux_amd64
sudo vim frps.ini
内容如下:
[common]
frp监听的端口,默认是7000,可以改成其他的
bind_port = 7000
授权码
token = #自己定义
frp管理后台端口
dashboard_port = 7500
frp管理后台用户名和密码
dashboard_user = 自己定义
dashboard_pwd = 自己定义
enable_prometheus = true
http映射相关
vhost_http_port = 8000
frp日志配置
log_file = /var/log/frps.log
log_level = info
log_max_days = 3 -
防火墙放行端口:
1
2
3
4
5
6
7
8
9
10
11
12
13
14添加监听端口
firewall-cmd --permanent --add-port=7000/tcp
添加管理后台端口
firewall-cmd --permanent --add-port=7500/tcp
添加http映射端口
firewall-cmd --permanent --add-port=8000/tcp
添加samba映射端口
firewall-cmd --permanent --add-port=5500/tcp
添加samba网页映射端口
firewall-cmd --permanent --add-port=6500/tcp
查看端口放行情况
iptables -L -n
重新加载
firewall-cmd --reload -
设置和启动frp服务:
1
2
3
4
5
6
7
8
9
10
mkdir -p /etc/frp
cp frps.ini /etc/frp
cp frps /usr/bin
cp systemd/frps.service /usr/lib/systemd/system/
systemctl enable frps
systemctl start frps
临时启动命令
./frps -c ./frps.ini
后台保持启动命令
nohup ./frps -c ./frps.ini & -
添加开机启动:
1
2
3
4
5
6
7
8
9
10
11
12
13
14
15
16
17
18
19
20
sudo vim /etc/systemd/system/frps.service
文件内容如下:
[Unit]
Description=frps daemon
After=syslog.target network.target
Wants=network.target
[Service]
Type=simple
ExecStart=/usr/local/frp_0.33.0_linux_amd64/frps -c /usr/local/frp_0.33.0_linux_amd64/frps.ini
Restart= always
RestartSec=1min
[Install]
WantedBy=multi-user.target
启动frps
systemctl daemon-reload
systemctl start frps
设置为开机启动
systemctl enable frps -
登录公网服务器IP地址:frp管理后台端口,输入账号和密码,即可查看frp后台管理界面。
-
-
NanoPi设置:
-
NanoPi客户端下载frp:https://github.com/fatedier/frp/releases/download/v0.33.0/frp_0.33.0_linux_arm.tar.gz
1
2
3
4
5
6
7
8
9
10
11
12
13
@windows32:
https://github.com/fatedier/frp/releases/download/v0.33.0/frp_0.33.0_windows_386.zip
@windows64:
https://github.com/fatedier/frp/releases/download/v0.33.0/frp_0.33.0_windows_amd64.zip
@mac:
https://github.com/fatedier/frp/releases/download/v0.33.0/frp_0.33.0_darwin_amd64.tar.gz
@linux32:
https://github.com/fatedier/frp/releases/download/v0.33.0/frp_0.33.0_linux_386.tar.gz
@linux64:
https://github.com/fatedier/frp/releases/download/v0.33.0/frp_0.33.0_linux_amd64.tar.gz
@树莓派32:https://github.com/fatedier/frp/releases/download/v0.33.0/frp_0.33.0_linux_arm.tar.gz
@树莓派64:
https://github.com/fatedier/frp/releases/download/v0.33.0/frp_0.33.0_linux_arm64.tar.gz -
使用WinScp将压缩包上传至NanoPi的/usr/local目录下,并解压缩:
1
tar -zxvf frp_0.33.0_linux_arm.tar.gz
-
配置frpc.ini:
1
2
3
4
5
6
7
8
9
10
11
12
13
14
15
16
17
18
19
20
21
22
23
24
25
26
27
28
29
30
31
32
33
34
35
36
37
38
39
40
41
42
43
44
45
cd ./frp_0.33.0_linux_arm
sudo vim frpc.ini
服务端配置
[common]
设置服务器公网IP
server_addr = #自己服务器的公网ip
请换成设置的服务器端口
server_port = 7000
token = #跟服务端配置的授权码一样
配置ssh服务:配置好后,访问云服务器公网ip的7000端口就等于访问我的nanopi的22端口
[ssh]
type = tcp
local_ip = 127.0.0.1
local_port = 22
remote_port = 2222
博客的映射,实际使用效果不是很理想,图片加载不出来。
[WEB]
type = http
local_ip = 127.0.0.1
local_port = 80
custom_domains = #自己服务器的公网ip
samba服务
[samba]
type = tcp
local_ip = 127.0.0.1
samba默认端口
local_port = 445
#自定义的远程访问端口,4545是转发端口,目的是将本地的445端口转发到远程服务器上面的4545端口中去。
remote_port = 5500
对外提供文件访问服务
[test_static_file]
type = tcp
remote_port = 6500
plugin = static_file
要对外暴露的文件目录,需要填写绝对路径
plugin_local_path =/media/myUsb
plugin_strip_prefix = static
进入网页时需要的账户和密码
plugin_http_user = #自己定义
plugin_http_passwd = #自己定义 -
防火墙放行端口:
1
2
firewall-cmd --permanent --add-port=2222/tcp
firewall-cmd --reload -
设置和启动frp服务:
1
2
3
4
5
6
7
8
9
10
mkdir -p /etc/frp
cp frpc.ini /etc/frp
cp frpc /usr/bin
cp systemd/frpc.service /usr/lib/systemd/system/
systemctl enable frpc
systemctl start frpc
临时启动
./frpc -c ./frpc.ini
后台保持启动
nohup ./frpc -c ./frpc.ini & -
添加开机启动:
1
2
3
4
5
6
7
8
9
10
11
12
13
14
15
16
17
18
19
20
21
sudo vim /etc/systemd/system/frpc.service
内容如下
[Unit]
Description=frpc daemon
After=syslog.target network.target
Wants=network.target
[Service]
Type=simple
ExecStart=/usr/local/frp_0.33.0_linux_arm/frpc -c /usr/local/frp_0.33.0_linux_arm/frpc.ini
Restart= always
RestartSec=1min
[Install]
WantedBy=multi-user.target
启动frpc
systemctl daemon-reload
systemctl start frpc
设置为开机启动
systemctl enable frpc -
每次修改完配置文件之后,需要kill之前的FRP进程,重新执行才可以更新配置:
1
2
ps -ef |grep frpc
kill -9 [进程号] -
-
NanoPi的U盘文件访问方法及其效果演示:
-
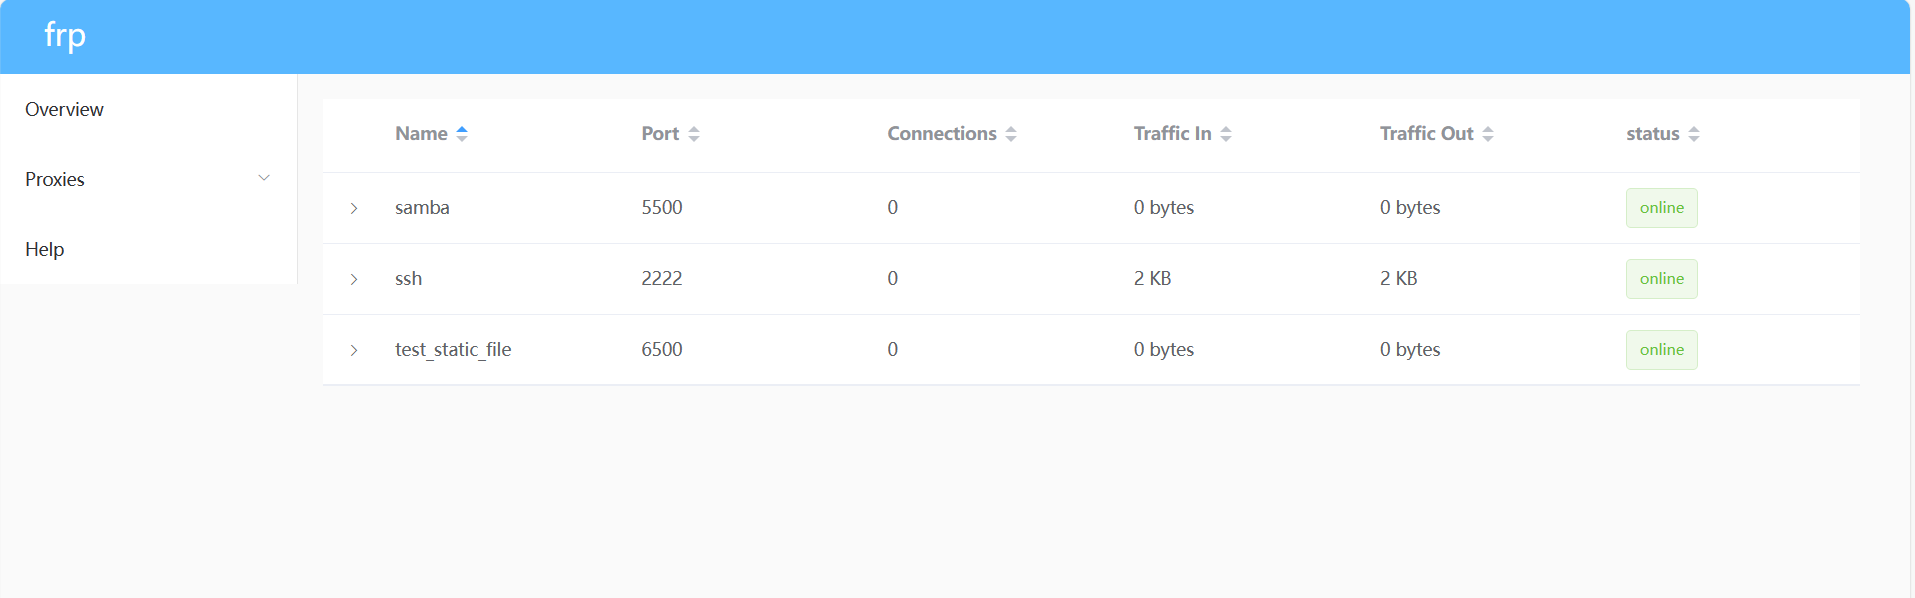
在浏览器输入自己公网ip地址:管理界面映射端口,即可查看映射服务列表,如下所示:
-
在putty软件中,使用自己云服务器的公网ip+ssh开放的端口2222,即可在外网条件下访问nanopi的命令控制界面。
-
在winscp软件中,使用自己云服务器的公网ip+ssh开放的端口2222,即可在外网条件下访问nanopi中的文件。
-
在浏览器中输入http://x.x.x.x:6500/static/,其中x.x.x.x即为云服务器的公网ip,即可在网页界面查看Samba共享的文件夹,如下图所示:【进入网页时,需要输入在客户端test_static_file项中配置的账号和密码】
-
第五部分 校园应用
**CzrTuringB:**前几天,我终于给NanoPi通上了校园网,因此在校园局域网下,使用SMB服务就不用再去内网穿透了。当然还是存在一定的问题:学校的运营商关闭了445端口的使用,因此需要重新给Samba配置端口,进而在登录SMB服务时速度过慢,操作繁琐。
-
SSH连接NanoPi,更改/etc/samba/smb.conf文件:
1
2
3
4
5
6
7
8编辑smb配置文件
sudo vim /etc/samba/smb.conf
在global下方添加下面内容:
smb ports=4450 1390
重启samba服务
sudo /etc/init.d/samba restart
查看samba服务使用的端口情况
sudo netstat -tlnp |grep smb -
安卓连接:
1
2
3
4
5
6
7
8
1、下载andSMB软件
2、创建服务
Version: SMB v1
主机名: NanoPi的IP地址
用户名:
密码:
在高级选项中设置端口为4450
3、配置完成后点击屏幕的文件夹进行连接即可,每次登录的认证速度较慢,耐心等待即可。【大约1~2分钟】 -
windows连接:
1
2
3
4
5
6
7
8
9
10
11
12
13
14
15
1、windows不能直接更改SMB的端口,因此需要进行端口转发
2、使用管理员身份打开命令管理窗口
#查看端口转发情况
netsh interface portproxy show all
#进行端口转发
netsh interface portproxy add v4tov4 listenport=445 listenaddress=127.0.0.1 connectport=4450 connectaddress=NanoPi的IP4地址
#查看端口转发情况
netsh interface portproxy show all
#如果想要删除端口转发,那么可以将add换为del,或者使用下面的指令清空所有的端口转发
netsh interface portproxy reset
3、打开控制面板--程序功能--启用或关闭windows功能,取消勾选SMB 1.0/CIFS服务器和SMB 1.0/CIFS服务器自动删除。
4、打开services.msc,将LanmanServer和Computer Browser服务禁用即可。
5、重启电脑
6、win+R,输入:\\127.0.0.1
7、输入账号和密码即可进入到网路邻居页面 -
FTP文件传输:
1
2
3
4
5
在学校每次使用smb进行文件传输共存在以下几个问题:
1、华为设备文件管理只支持smb传输协议并且无法向windows系统那样进行端口转发。
2、每次进行smb认证时速度过慢。
3、在windows上配置端口转发过程繁琐,需要进行重启。
所以我更换了文件传输协议,解决了上述问题,其中移动端可以安装ES文件浏览器来访问网盘中的数据,但是这个软件免费使用的话广告很多【如有需要可以直接购买永久版去除广告限制】1、NanoPi安装vsftpd:
1
sudo apt-get install vsftpd
2、编辑配置文件:
1
2
3
4
5
6
7
8
9
10
11
12
13
14
15
16
17
18
19
20
21
22
23
24
25
26
27
28
29
30
31
32
33
34
35
36
37
38
39
40
41
42
43
44
45
46
47
48
49
50
51
52
53
54
55
56
57
58
59
60
61
62
63
64
65
66
67
68
69
70
71
72
73
74
75
76
77
78
79
80
81
82
83
84
85
86
87
88
89
90
91
92
93
94
95
96
97
98
99
100
101
102
103
104
105
106
107
108
109
110
111
112
113
114
115
116
117
118
119
120
121
122
123
124
125
126
127
128
129
130
131
132
133
134
135
136
137
138
139
140
141
142
143
144
145
146
147
148
149
150
151
152
153
154
155
156
157
158
159
sudo vim /etc/vsftpd.conf
文件内容如下:
Example config file /etc/vsftpd.conf
# The default compiled in settings are fairly paranoid. This sample file
loosens things up a bit, to make the ftp daemon more usable.
Please see vsftpd.conf.5 for all compiled in defaults.
# READ THIS: This example file is NOT an exhaustive list of vsftpd options.
Please read the vsftpd.conf.5 manual page to get a full idea of vsftpd's
capabilities.
#
Run standalone? vsftpd can run either from an inetd or as a standalone
daemon started from an initscript.
listen=NO
# This directive enables listening on IPv6 sockets. By default, listening
on the IPv6 "any" address (::) will accept connections from both IPv6
and IPv4 clients. It is not necessary to listen on *both* IPv4 and IPv6
sockets. If you want that (perhaps because you want to listen on specific
addresses) then you must run two copies of vsftpd with two configuration
files.
listen_ipv6=YES
# Allow anonymous FTP? (Disabled by default).
anonymous_enable=NO
# Uncomment this to allow local users to log in.
local_enable=YES
# Uncomment this to enable any form of FTP write command.
write_enable=YES
# Default umask for local users is 077. You may wish to change this to 022,
if your users expect that (022 is used by most other ftpd's)
local_umask=022
# Uncomment this to allow the anonymous FTP user to upload files. This only
has an effect if the above global write enable is activated. Also, you will
obviously need to create a directory writable by the FTP user.
anon_upload_enable=YES
# Uncomment this if you want the anonymous FTP user to be able to create
new directories.
anon_mkdir_write_enable=YES
# Activate directory messages - messages given to remote users when they
go into a certain directory.
dirmessage_enable=YES
# If enabled, vsftpd will display directory listings with the time
in your local time zone. The default is to display GMT. The
times returned by the MDTM FTP command are also affected by this
option.
use_localtime=YES
# Activate logging of uploads/downloads.
xferlog_enable=YES
# Make sure PORT transfer connections originate from port 20 (ftp-data).
connect_from_port_20=YES
# If you want, you can arrange for uploaded anonymous files to be owned by
a different user. Note! Using "root" for uploaded files is not
recommended!
chown_uploads=YES
chown_username=whoever
# You may override where the log file goes if you like. The default is shown
below.
xferlog_file=/var/log/vsftpd.log
# If you want, you can have your log file in standard ftpd xferlog format.
Note that the default log file location is /var/log/xferlog in this case.
xferlog_std_format=YES
# You may change the default value for timing out an idle session.
idle_session_timeout=600
# You may change the default value for timing out a data connection.
data_connection_timeout=120
# It is recommended that you define on your system a unique user which the
ftp server can use as a totally isolated and unprivileged user.
nopriv_user=ftpsecure
# Enable this and the server will recognise asynchronous ABOR requests. Not
recommended for security (the code is non-trivial). Not enabling it,
however, may confuse older FTP clients.
async_abor_enable=YES
# By default the server will pretend to allow ASCII mode but in fact ignore
the request. Turn on the below options to have the server actually do ASCII
mangling on files when in ASCII mode.
Beware that on some FTP servers, ASCII support allows a denial of service
attack (DoS) via the command "SIZE /big/file" in ASCII mode. vsftpd
predicted this attack and has always been safe, reporting the size of the
raw file.
ASCII mangling is a horrible feature of the protocol.
ascii_upload_enable=YES
ascii_download_enable=YES
# You may fully customise the login banner string:
ftpd_banner=Welcome to blah FTP service.
# You may specify a file of disallowed anonymous e-mail addresses. Apparently
useful for combatting certain DoS attacks.
deny_email_enable=YES
(default follows)
banned_email_file=/etc/vsftpd.banned_emails
# You may restrict local users to their home directories. See the FAQ for
the possible risks in this before using chroot_local_user or
chroot_list_enable below.
在这里配置ftp能够访问的路径
local_root=/media/myUsb/
chroot_local_user=NO
anon_root=/media/myUsb/
# You may specify an explicit list of local users to chroot() to their home
directory. If chroot_local_user is YES, then this list becomes a list of
users to NOT chroot().
(Warning! chroot'ing can be very dangerous. If using chroot, make sure that
the user does not have write access to the top level directory within the
chroot)
chroot_list_enable=NO
(default follows)
chroot_list_file=/etc/vsftpd.chroot_list
# You may activate the "-R" option to the builtin ls. This is disabled by
default to avoid remote users being able to cause excessive I/O on large
sites. However, some broken FTP clients such as "ncftp" and "mirror" assume
the presence of the "-R" option, so there is a strong case for enabling it.
ls_recurse_enable=YES
# Customization
# Some of vsftpd's settings don't fit the filesystem layout by
default.
# This option should be the name of a directory which is empty. Also, the
directory should not be writable by the ftp user. This directory is used
as a secure chroot() jail at times vsftpd does not require filesystem
access.
secure_chroot_dir=/var/run/vsftpd/empty
# This string is the name of the PAM service vsftpd will use.
pam_service_name=vsftpd
# This option specifies the location of the RSA certificate to use for SSL
encrypted connections.
rsa_cert_file=/etc/ssl/certs/ssl-cert-snakeoil.pem
rsa_private_key_file=/etc/ssl/private/ssl-cert-snakeoil.key
ssl_enable=NO
# Uncomment this to indicate that vsftpd use a utf8 filesystem.
utf8_filesystem=YES3、启动ftp服务:
1
sudo /etc/init.d/vsftpd start
4、电脑端连接ftp服务器:
1
2
3
4
5
6
1、打开此电脑
2、右键点击网络----选择映射网络驱动器----连接到可用于存储文档和图片的网站
3、连接地址输入:
ftp://NanoPi的IP地址
4、取消勾选匿名登录,输入之前设置的用户名称
5、点击完成即可创建映射,打开此电脑,在网路位置一栏即可看见我们的网盘5、移动端安装ES文件浏览器,在其中的网络中添加FTP服务器,输入相应的IP地址、用户名、密码即可。